
Workplace hazards are nothing to take lightly.
5333 workers lost their life in 2019 due to workplace accidents, that’s about 100 a week!
We didn’t make this number up, this was data that was released by the US Department of Labor.
As the safety manager for your company you are responsible for making sure the work environment is safe at all times.
That’s why you have to be proactive to seek out any potential hazards.
This is one of the areas where job hazard analysis shines
One of the first things to consider when it comes to employee safety is determining what kind of hazards they could potentially encounter in the workplace.
Whether working on elevated surfaces or working with dangerous chemicals, the most crucial step is to assess the job tasks to determine what kind of hazards could be present.
Here’s the thing, if you do not know what kind of hazards are present or what type of risks your workers are exposed to, it won’t be easy to protect them.
So, how can you determine what kind of hazards are present?
By conducting a Job Hazard Analysis (JHA), also called a Job Safety Analysis.
A job hazard analysis is a process that focuses on:
- The work that is performed
- The relationship between the employee
- The task being performed
- The tools used and the physical work environment
Conducting a job hazard analysis identifies the hazards and allows employers to apply corrective actions before an injury can occur.
Here are some simple steps that you can use to complete a job hazard analysis of the work performed in your workplace.
How To Do Job Hazard Analysis (Example and Template Included)
Step 1: Start with the job description
I’ve seen this happen a lot during my career, where hazard analysis is done without even considering the job description.
This is a big mistake.
In my opinion this should be always the starting point of every JHA.
So when completing a JHA reach out to the Human Resources Department (HR) for the job description.
Request a copy of the job descriptions for each position that will be analyzed.
Reviewing the job description can provide insights into the role, functional responsibilities, and abilities required for performing the task.
Step 2: Start the analysis
After you have reviewed the job description, then the analysis can begin.
Get a Job Hazard Analysis Form, you don’t need anything complicated. Below is a simple example that you can download and use.
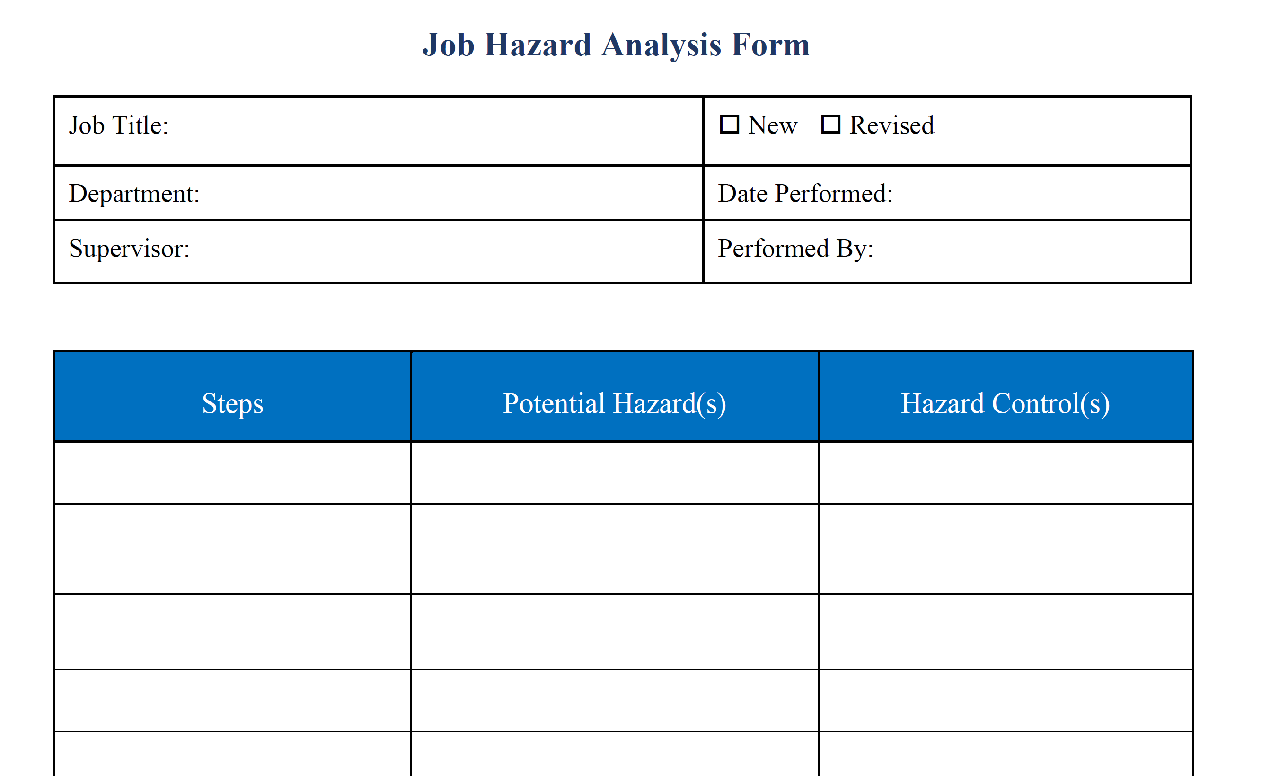
The first section of the JHA has some necessary information such as the job title, department, supervisor, date, and who performed that analysis.
In the Job Hazard Analysis form pictured above, pay special attention to the Steps, Potential Hazards, and the Hazard Control columns.
Let us look at each column a little closer.
The Steps Column
In this column, each task is breakdown down into sequential steps that will be analyzed.
For instance, if you were changing out a damaged industrial ceiling fan, some of the steps could include:
Step 1: Perform Lock Out Tag Out Operation to disconnect all power sources to the fan.
Step 2: Select the correct personal protective equipment (PPE)
Step 3: Select the right man lift for the task.
Step 4: Conduct a safety inspection of the man lift.
When identifying the steps that will be analyzed, the best approach is to collaborate with experienced supervisors or workers familiar with the process.
Collaborating with these individuals is invaluable because they can explain the steps in detail, point out potential safety hazards, and, most importantly, demonstrate the process.
The last thing you want to do is go through all the trouble of coming up with a process that does not work in the field.
So, take the time to collaborate with the workers who will be the end-user of the process.
The Potential Hazards Column
The middle column identifies the Potential Hazards.
In this section, document the potential hazards, hazardous events, or exposures that may occur that could cause an injury to happen at that step.
There is no best way to list the potential hazards – each step can have multiple hazards, not just one.
A systematic approach to list the potential hazards is identifying the event or exposure that can injure or cause harm or exposure.
In the steps listed above for changing out the damaged fan, we can identify potential hazards at each stage in the table below.
| Steps | Potential Hazard |
| 1. Perform Lock Out Tag Out Operation to disconnect ALL power to the fan. | Contact with energized circuit or”live wires.” |
| 2. Select the correct Personal Protective Equipment | – Lack of PPE could cause head injuries/struck against an accident. – Lack of correct PPE could lead to eye injuries, cuts, and lacerations. |
| 3. Select the right equipment – man lift for the task. | – Selecting the incorrect man lift could cause injury to structure and others. – Employee not trained on the specific machine. – Misuse of man lift |
| 4. Conduct safety inspection of the man lift | Not conducting a safety inspection on the man lift could miss damaged components or faulty equipment that can lead to worker injury. |
As you can see from the table above, the analysis is starting to take shape.
We have identified the steps and the potential hazards that could be encountered performing each action.
Next, we will discuss the Hazard Control section of the JHA.
The Hazard Control Column
This section of the analysis form is used to identify the methods used to prevent injury or any harm to workers.
Additionally, this column can be used to record tactics that will be utilized to mitigate or minimize the extent of injury or harm should one occur.
For example, if the JHA identifies that a worker should use fall protection to prevent falls to lower levels.
Suppose an individual falls and is suspended in the lanyard. In that case, a note in the Hazard Control section could identify what actions crew members should take to prevent the worker from sustaining an additional injury.
Before we address these hazards let’s review the levels that can be used to prevent employee injury
Applying The Occupational Safety and Health Administration (OSHA) hierarchy of control to each hazard is the best approach when dealing with hazards.
These controls include:
- Eliminating the hazard
- Substitution – replace the hazard,
- Engineering controls – isolating workers from the hazard,
- Administrative controls – change the way the work is performed
- And personal protective equipment- protect workers from hazards by using PPE.
Now that the potential solutions to address each hazard has been identified, we can apply them to the example of changing the industrial fan.
The table below illustrates the Steps, Potential Hazards, and Hazard Controls using the hierarchy of controls.
| STEPS | POTENTIAL HAZARDS | HAZARD CONTROLS |
| 1. Perform Lock Out Tag Out Operation to disconnect ALL power to the fan. | Contact with energized circuit or “live wires.” | – Train worker on LOTO process. – Workers must follow all procedures for LOTO of energized equipment. – The supervisor will review steps to ensure the worker understands the proper LOTO procedure |
| 2. Select the correct Personal Protective Equipment | – Lack of PPE could cause head injuries/struck against an accident. – Lack of correct PPE could lead to eye injuries and lacerations. | Eye protection, a hard hat, gloves, and a full-body harness must be used when replacing the fan. The employee must be tied off 100% while in a man lift. |
| 3. Select the right equipment – man lift for the task. | – Selecting the incorrect man lift could cause injury to structure and others. – Employee not trained on the specific machine. – Misuse of man lift | – Review manufacturer’s instructions to ensure the correct lift is used in the work area. – When equipment is selected, the worker must be trained and demonstrate proficiency with using the equipment. – Document training |
| 4. Conduct safety inspection of the man lift | Not conducting a safety inspection on the man lift could miss damaged components or faulty equipment that can lead to worker injury. | Review the owner’s manual and use a checklist to complete an inspection of the equipment before each use. |
As a safety professional protecting your workers from injury and harm in the workplace is always the primary goal.
Using a Job Hazard analysis to assess a work process to identify potential hazards is a beneficial tool to any organization that wants to keep its employees safe and healthy.
How to educate your employees about safety measures
After you have completed the job hazard analysis and fixed the issues, now the real task begins.
Educating your team.
The safety analysis doesn’t matter if you don’t consistently educate your employees about safety measures.
You can’t expect to just hold a safety meeting now and then and think it will be cemented in their minds.
Employees have a lot on their minds and as the safety manager you must find a way to make sure safety is at the forefront of their minds.
This is where regular toolbox talks shine.
Read this next guide shows you how to do it effectively.